Now a days, marketing for apps / games has more focus on engaging users directly rather than doing experiments under the hood. Push notification has its own significance in achieving this goal. It can be incredibly helpful if used with proper plan in terms of frequency, time and relevance.
Push notifications with added filtration based on location can be more helpful in making it relevant and decreasing the frequency to avoid annoyance.
Hoy en día, marketing para aplicaciones o juegos tiene un mayor enfoque en comprometer a los usuarios directamente, en vez de hacer experimentos bajo la mesa. Notificaciones push tienen su propio significado para lograr el objetivo. Pueden ser de gran ayuda si se usan bajo un plan apropiado en términos de frecuencia, tiempo y relevancia.
Notificaciones push con filtros añadidos basados en localización, pueden ser muy útiles en términos de relevancia y en la disminución de la frecuencia con el fin de evitar molestias.
On continuous request coming from our users, App42 has come up with location based push notifications that enables you as app admin to send notifications to the app users based on specific geo-location.
Here we will be discussing about how to
- configure your xcode project to receive and handle the geo-based push notification
- send geo-based push from our AppHQ Console
Getting Started with App42:
If you have not integrated App42 SDK yet then download our SDK and follow the Getting started guide.
Configure Xcode Project:
To make your project ready for geo-based push, the project must be configured for
- receiving Push Notifications, and
- location based manipulations
This blog assumes you have prior knowledge of configuring the project for Push Notification which involves:
- Certificate & provisional profile creation from iOS Dev Center
- Registering your device to receive push notification
- Storing device token to App42 Cloud
If you are new to iOS Push notification then follow our App42 iOS Push Notification Tutorial.
To make the integration hassle free, I have created a plugin that manages all the dirty work under the hood and you just need to call one of its method to start using. So first download the plugin from here then drag and drop the plugin folder to your xcode project to add.
The plugin does some operations in the background when push comes, so it’s time to do some background related settings as follows:
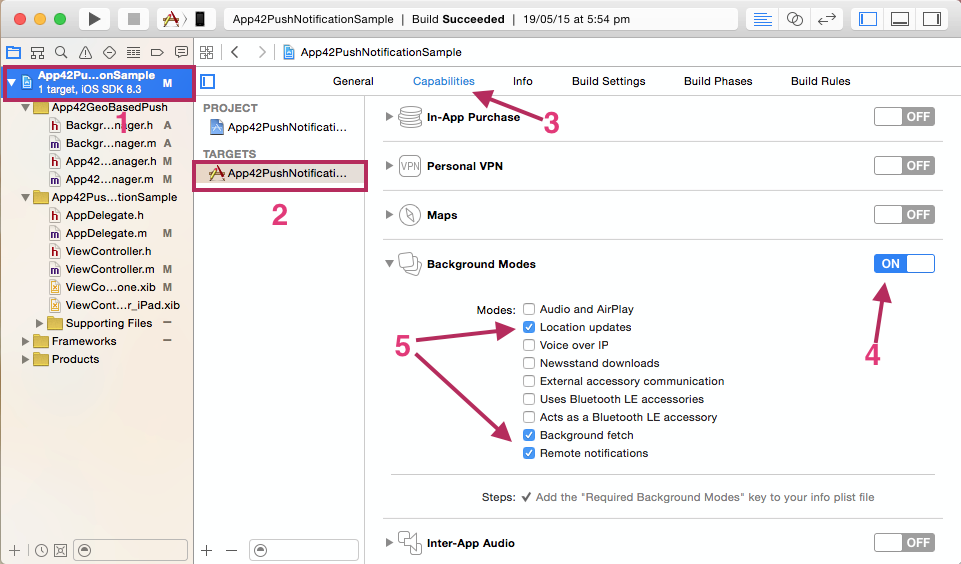
- Select your project from project navigator in left pane of your xcode
- Select project target under TARGETS in the middle pane of your xcode
- Select Capabilities option from the options available on the top of the middle pane
- Search for Background Modes from the list and enable it by clicking on the toggle button shown in above image
- Now select Location updates, Background fetch and Remote notifications options to enable

Figure-1: Xcode Settings
Also open the info.plist file and add NSLocationAlwaysUsageDescription key with relevant message like “Enabling location tracking allows friends to see where you are.”
Start Coding:
Once you are done with the settings mentioned above then it’s time to write some code to use the plugin you added above.
- First add the following import statement in AppDelegate.m class:
[code java]#import "App42PushManager.h"[/code]
- Add the following code to your “application: didFinishLaunchingWithOptions:” method of AppDelegate.m class:
[code java]- (BOOL)application:(UIApplication *)application didFinishLaunchingWithOptions:(NSDictionary *)launchOptions
{
	[App42API initializeWithAPIKey:@"APP42_APP_KEY" andSecretKey:@"APP42_SECRET_KEY"];
	//[App42API enableApp42Trace:YES]; //Enable to see SDK internal logs

	// Initialize the plugin
	[App42PushManager sharedManager];
	return YES;
}[/code]
The above code initializes App42API and the push plugin you added above. Dont forget to replace API_KEY and SECRET_KEY with the values you got from AppHQ Console.
- Now add following delegate method to handle the push on receiving in AppDelegate.m class:
[code java]-(void)application:(UIApplication *)application didReceiveRemoteNotification:(NSDictionary *)userInfo fetchCompletionHandler:(void (^)(UIBackgroundFetchResult))completionHandler
{
	/**
 	* Handles the geo based push messages and decides the eligibility of the push that should be shown to user or not
 	*/
	[[App42PushManager sharedManager] handleGeoBasedPush:userInfo fetchCompletionHandler:completionHandler];
}[/code]
Sending Push from AppHQ Console:
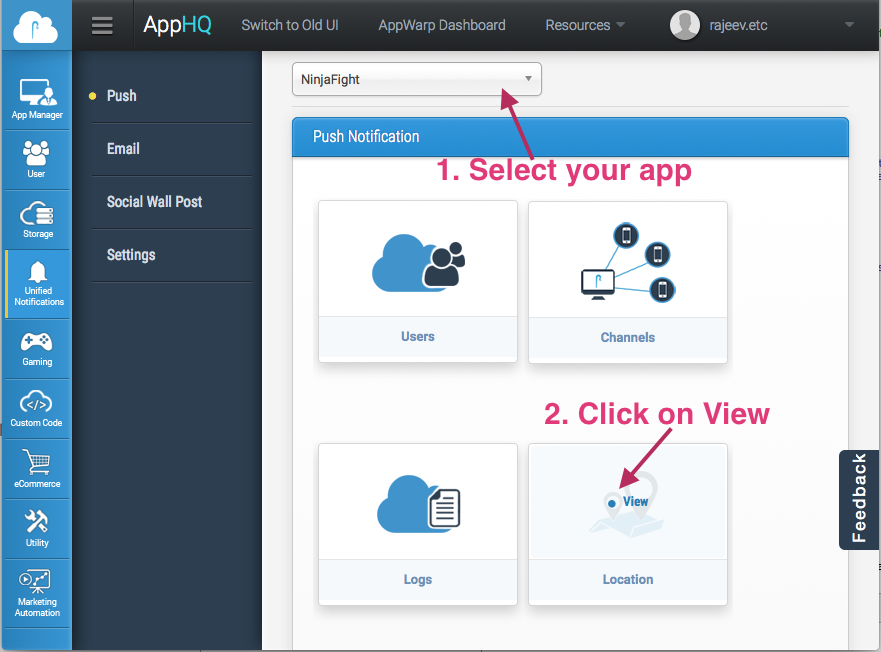
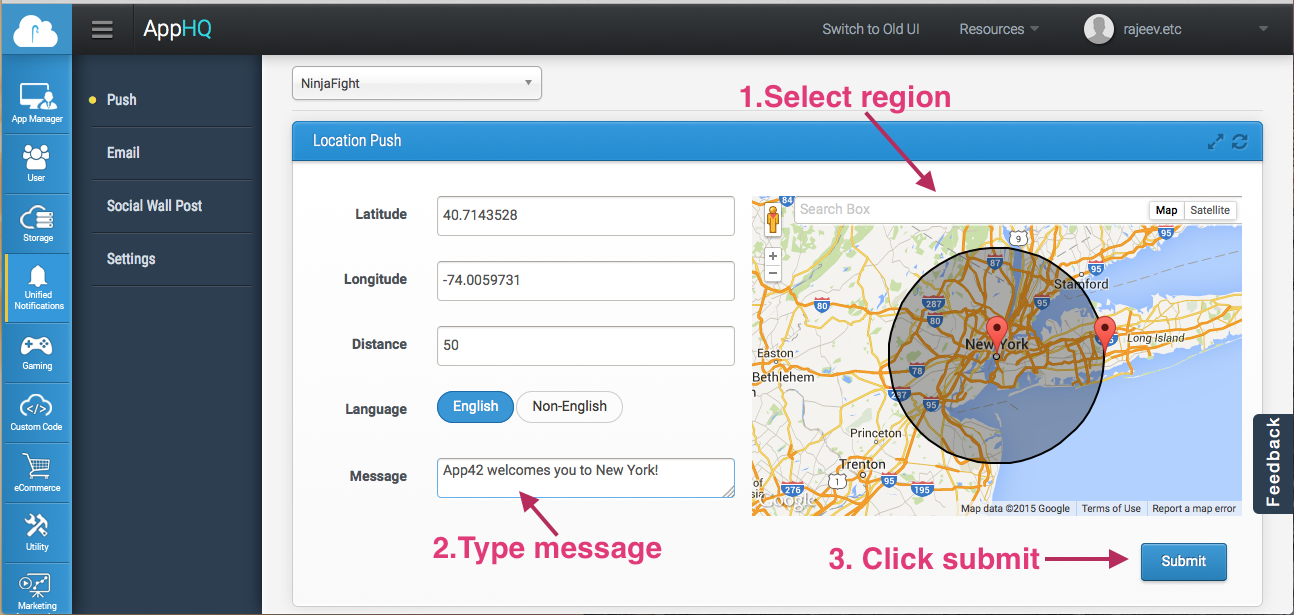
Once you have done all the configuration and settings for push notification inside the application as well as on the AppHQ Console, then you just have to select the location and type your message to send it to the users residing on the desired location as shown in Figure-2 and Figure-3.

Figure 2

Figure 3
Debido a continuas solicitudes por parte de nuestros usuarios, App42 ha creado notificaciones push basadas en la localización que le permite a usted como administrador de la aplicación, enviar notificaciones a los usuarios de la aplicación basado en geolocalizaciones específicas.
A continuación discutiremos acerca de cómo hacerlo
- Configure su xcode Project para recibir y gestionar la notificación push basada en geolocalización
- Envíe push basada en geolocalización desde AppHQ Console
Empiece con App42:
Si no ha integrado App42 SDK descargue nuestra SDK y siga la siguiente guía Getting started guide.
Configure Xcode Project:
Para tener su proyecto listo para push basadas en geolocalización, el proyecto debe estar configurado para:
- Recibir Notificaciones Push
- Manipulación basada en localización
En este blog se asume que posee conocimiento previo de configuración del proyecto para Notificaciones Push el cual abarca:
- Certificación y creación de perfil provisional de iOS Dev Center
- Registro de su dispositivo para recibir notificaciones push
- Unidad de almacenamiento para App42 Cloud
Si es nuevo en Notificaciones Push iOS, siga nuestro tutorial App42 iOS Push Notification Tutorial.
Para hacer la configuración si complicaciones, he creado un plugin que gestiona todo el trabajo sucio bajo la mesa y usted solo necesita llamar uno de estos métodos para empezar a usarlo. Así que primero descargue el plugin desde aquí luego arrastre la carpeta del plugin hasta su xcode Project para agregarlo.
El plugin hace algunas operaciones de fondo cuando una notificación llega, así que es momento de hacer algunas configuraciones de fondo como a continuación:
- Seleccione su proyecto desde el navegador de proyectos en el panel izquierdo de su xcode.
- Seleccione el objetivo del proyecto en Targets en el panel medio de su xcode.
- Seleccione la opción Capabilities en la opción disponible en la parte superior del panel medio
- Busque por Background Modes desde la lista y actívelo dándole click en botón de activación mostrado en la imagen de abajo
- Ahora selección actualizaciones de Localización, Background fetch y Remote Notifications para activarlas.

Figure-1: Xcode Settings
También abra el archivo info.plist y agregue la clave NSLocationAlwaysUsageDescription con un mensaje relevante como “Activando localización le permite a sus amigos ver donde se encuentra”.
Empiece la codificación:
Una vez haya terminado con las configuraciones mencionadas anteriormente, ahora es el momento de escribir algo de codificación para usar el plugin que añadió antes.
- Primero agregue la siguiente declaración de importación en AppDelegate.m class:
#import "App42PushManager.h"
- Agregue la siguiente codificación a su aplicación: didFinishLaunchingWithOptions método de AppDelegate.m class:
- (BOOL)application:(UIApplication *)application didFinishLaunchingWithOptions:(NSDictionary *)launchOptions
{
	[App42API initializeWithAPIKey:@"APP42_APP_KEY" andSecretKey:@"APP42_SECRET_KEY"];
	//[App42API enableApp42Trace:YES]; //Enable to see SDK internal logs

	// Initialize the plugin
	[App42PushManager sharedManager];
	return YES;
}
El código anterior inicia App42API y el plugin push que agregó antes. No olvide reemplazar API_KEY y SECRET_KEY con los valores que tiene desde AppHQ Console.
- Ahora agregue el siguiente método delegado para gestionar la push recibida en AppDelegate.m class:
-(void)application:(UIApplication *)application didReceiveRemoteNotification:(NSDictionary *)userInfo fetchCompletionHandler:(void (^)(UIBackgroundFetchResult))completionHandler
{
	/**
 	* Handles the geo based push messages and decides the eligibility of the push that should be shown to user or not
 	*/
	[[App42PushManager sharedManager] handleGeoBasedPush:userInfo fetchCompletionHandler:completionHandler];
}
Enviar notificaciones desde AppHQ console:
Una vez haya hecho toda la configuración y ajustes para notificaciones push dentro de la aplicación como en AppHQ Console, ahora solo tiene que seleccionar la localización y escribir su mensaje para enviarlo a los usuarios que residen en la ubicación deseada como se muestra en la Figura 2 y Figura 3.

Figure 2

Figure 3


Leave A Reply