Sometimes, after our App has gone live, we feel the need to change some logic in the App based on market feedback. We sometimes realize that a few changes can increase the App’s user retention, runtime performance etc. But as the App/game is live, hence nothing can be done till the next release.
Here comes App42 Custom Code feature that allows you to put some code on the cloud, that you may like to alter depending upon how well the App is performing
(To read more on Custom Code, visit this blog).
How it works:
- Write your custom code in java, test it and make .jar file.
- Upload the .jar file on cloud.
- Call your custom API from the App and it’s done.
Writing Custom Code:
To illustrate the Custom Code feature in detail, I have written a sample iOS project as well as a sample custom code. First download the sample iOS project and sample custom code from our Github Repo. The downloaded folder has two subfolders namely, App42_CustomCode_jar and App42_CustomCode_Sample. Browse through the App42_CustomCode_jar folder and open CustomCodeSample.java file as follows:
- Import the App42_CustomCode_jar in your Eclipse IDE.
- Open Java source file CustomCodeSample.java inside com.shephertz.app42.paas.customcode.sample folder.
What the sample custom code does?
- Creates App42 user.
- Authenticates the created user.
Keynotes:
- CustomCodeSample class must implement a predefined class Executor as follows:
[code java]public class CustomCodeSample implements Executor {

@Override
public HttpResponseObject execute(HttpRequestObject request) { }

}[/code]
- Your custom code must be written inside the method Execute mentioned in above code.
Also Read: A Developer’s Dilemma: When to use Custom Code
Now let me walk you through the code written inside the Execute method of CustomCodeSample.
[code java]public HttpResponseObject execute(HttpRequestObject request)
 {
        // Fetching request body
		JSONObject body = request.getBody();
		ServiceAPI sp =null;
		try{
                        // Checking required info from request body and their validity

			if(body.getString("apiKey")!= null || body.getString("apiKey")!= "" ||

			body.getString("secretKey")!= null || body.getString("secretKey")!= ""){
				apiKey = body.getString("apiKey");
				secretKey = body.getString("secretKey");
				sp =  new ServiceAPI(apiKey, secretKey);
		        }
			if(body.getString("userName")!= null || body.getString("userName")!= "") {
				userName = body.getString("userName");
			}
			if(body.getString("password")!= null || body.getString("password")!= "") {
				password = body.getString("password");
			}
			if(body.getString("emailId")!= null || body.getString("emailId")!= "") {
				emailId = body.getString("emailId");
			}
			if(body.getString("moduleName")!= null || body.getString("moduleName")!= "") {
				moduleName =  body.getString("moduleName");
			}

		}
        catch (JSONException e1)
        {
                        // Logging exception to AppHQ Console

			LogService logger = sp.buildLogService();
			logger.error("JSON Error :" , e1.getMessage());
	}
		LogService logger = sp.buildLogService();

		// Build Log Service For logging in Your Code

		logger.debug(" Recieved Request Body : :" + body.toString(), moduleName);

		// Write Your Custom Code Here
		// ......//
		JSONObject jsonResponse = new JSONObject();
		logger.info("Running Custom Code  ", moduleName);
		UserService userService = sp.buildUserService();
        try
        {
                       // Creating User

			User createUser = userService.createUser(userName, password,
					emailId);
			if(createUser.isResponseSuccess())
                        {
                               // Authenticating User

				User authUser = userService.authenticate(userName,
						password);
				jsonResponse.put(moduleName,authUser);
			}
	}
        catch (App42Exception exception)
        {
			if (exception.getAppErrorCode() == 2001)
                        {
				try
                                {
                                       // Authenticating User

					User authCatchUser = userService.authenticate(userName,
							password);
					jsonResponse.put(moduleName,authCatchUser);
				}
                               catch (App42NotFoundException notFoundException)
                               {
                                         // Logging exception to AppHQ Console

					logger.error("App42Exception :  ", notFoundException.getMessage());
				}
                               catch (JSONException e)
                               {
                                        // Logging exception to AppHQ Console

					logger.error("App42Exception : ", e.getMessage());
				}
			}
			else
			{
                               // Logging exception to AppHQ Console

				logger.error("App42Exception :  ", exception.getMessage());
			}
		}
        catch (JSONException e)
        {
                         // Logging exception to AppHQ Console

			logger.error("JSON Exception :  ", e.getMessage());
	}
		// Return JSON Response and Status Code
		return new HttpResponseObject(HTTP_STATUS_SUCCESS, jsonResponse);
 }[/code]
In the above code we are:
- fetching the request body
- checking for the parameters sent as request body
- creating user
- authenticating the user
- logging the exception occurred if request fails (that will be available to you inside your AppHQ console).
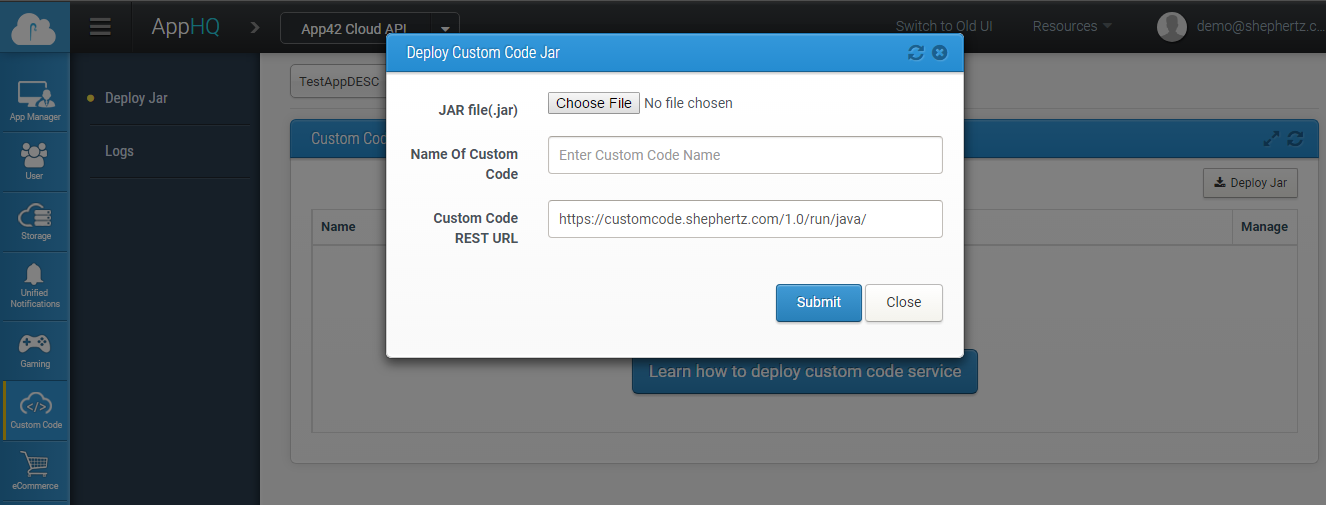
Deploy Your Custom Code using our AppHq Dashboard as follows:
- Login to AppHQ
- Go to the AppHQ Menu -> Custom Code -> Deploy Service in the left side panel of the Dashboard
- Select your App Name from the drop down menu
- Browse the Custom Code Jar File that you have created
- Enter the name of the CustomCode for this sample, say “CustomCodeTestSample”, click on submit and you are done.
Accessing the custom code from Client side:
- Open the Xcode project from the folder App42_CustomCode_Sample that you downloaded above. Browse through the method registerUser in the class called App42ViewController.m
[code java]- (void) registerUser
{
    NSString *_name    = [_nameTextField text];
    NSString *_email   = [_emailTextField text];
    NSString *_pass    = [_passwordTextField text];

    [App42API initializeWithAPIKey:API_KEY andSecretKey:SECRET_KEY];
    CustomCodeService *_service = [App42API buildCustomCodeService];

    /* Creating Request Body*/

    NSDictionary *_requestBody = [NSDictionary dictionaryWithObjectsAndKeys:
                                  API_KEY,@"apiKey",
                                  SECRET_KEY,@"secretKey",
                                  @"CustomCodeTestSample",@"moduleName",
                                  _name,@"userName",
                                  _pass,@"password",
                                  _email,@"emailId",nil];

    App42Response *_response = [_service runJavaCode:@"CustomCodeTestSample" requestBody:_requestBody];
    NSLog(@"[_response strResponse] = %@",[_response strResponse]);
    [_responseTextView setText:[_response strResponse]];
}[/code]
- Initialize App42API
- Create custom code request body as in above code
- Call runJavaCode API of our CustomCodeService and you are done
Also Read: Best Practices for Writing Cloud Code
If you have any requirement where you are looking to use these restricted APIs or any other third party Jar file, do write to us at support@shephertz.com.


Leave A Reply