In my previous blog, I had discussed some cool tech stuff that Amazon provides, mainly about Amazon EC2. Here, I will talk about the usage of AWS Tools.
Creating your first Virtual Server using Amazon EC2 Console
To get started with this tool, you need to Sign Up for an AWS account. Once you are done, log in to your account.
I know, you are really excited to create your first Instance, so without wasting any time, lets get started with your EC2 console.
1. Once you log in to your account, you will see the dashboard. Click on ‘EC2‘, to get started with Amazon EC2 dashboard.
2. Now, you will see the summary of all resources. You can also select the region from the top right corner. To create a new Instance, click ‘Launch Instance‘ button.
3. After clicking the ‘Launch Instance‘ button, you will land on ‘Choose AMI‘ page. On this page, if you notice, you will see different AMIs already installed on Amazon. You can choose from these Amazon AMIs (free AMIs) or you can also choose from AWS Marketplace (both free and paid AMIs are available) or you can also select from AMIs, that you have created, in My AMIs section. Click the ‘Select‘ button to use that particular AMI.
4. After selecting an AMI, you have to select the ‘Instance Type‘ of your instance. Once you have selected the instance type, click on the ‘Next: Configure Instance Details‘ button to continue.
5. Here, you can configure the instance details as per your requirement. e.g, You can set the number of instance to 2, in order to launch multiple instances from the same AMI. Once you are done, click ‘Next: Add Storage‘ button to add storage to your instance.
6. In this section, you can add persistence storage to your instance. By default, your instance comes with an instance storage, which is temporary i.e, when Instance is stopped or terminated, the data residing on this storage gets deleted. So, in order to save data, you need to add a volume and for that you need to click on ‘Add New Volume‘ button. Once you have completed this process, click on ‘Next: Tag Instance‘ to tag your Instance.
7. In this section, you can tag your instance i.e, You can define a tag with key = Name and value = ‘MyFirstAwsInstance’, so that you can recognize the particular instance with its Name. After tagging your instance, click ‘Next: Configure Security Group‘ button to continue.
8. Here, you can create a new Security Group or configure an old one. Clicking on ‘Add Rule‘ button, will let you add a new rule to your security group. After configuring, click ‘Review and Launch‘ button to review instance configuration you have done in all the previous steps.
9. After you have verified the instance configuration detail, click ‘Launch‘ button to launch the instance.
10. Before the Instance launch, Amazon will ask you either to create a new Key Pair or to use the existing one. After picking either option, you have to click ‘Download Key Pair‘, to download the Key Pair. This Key Pair will help you access the newly created Instance. Once you have downloaded the key, click ‘Launch Instances‘, to start the Instance creation.
11. Now, you will get the the status of your created Instance. Click ‘View Instance‘, to go to the Instance Dashboard.
12. You have successfully created your first Instance. Now, you can see the list of the Instances in your dashboard. Click on the Instance, to know further details.
I know you are bored reading this blog. So, to make it more interesting and easy, I have created a sample video for your better understanding. Hope you would like it. 😀
See, how simple it is to use Amazon EC2 Console for creating new Instances. Following this process, you can create more instances with several AMIs of different configurations.
Manage your newly created Virtual Server
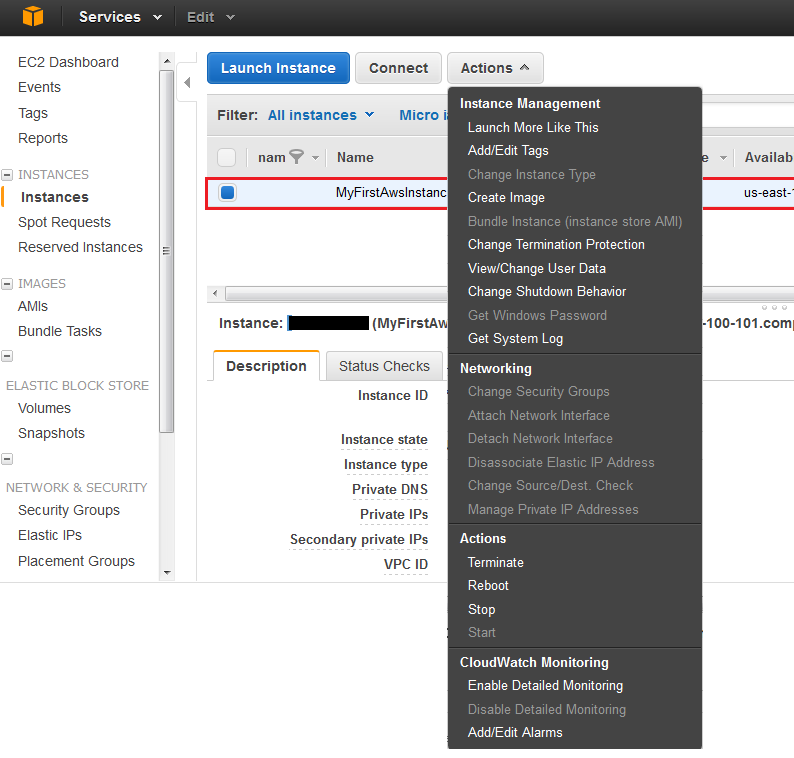
Amazon EC2 provides you the option to manage your Instance in simple and easy way. Simply, select an instance, then choose an activity from ‘Actions‘ (located at the top), you want to take on the selected instance.
The actions you can perform on your Instance let you:
- Launch More Like This: Create duplicates of the selected instance.
- Add/Edit Tags: Add a new tag or edit an old one.
- Create Image: Create an AMI of the selected instance.
- Change termination Protection: Change the instance termination protection policy. Enabling the termination protection will not let you terminate the instance.
- View/Change User Data: View and change the User Data. Note that you can only change the User Data, when instance is stopped.
- Change Shutdown Behavior: Change the shutdown behavior of the instance i.e, On instance shutdown, if shutdown behavior is ‘stop’, the instance will get stopped and if shutdown behavior is ‘terminated’, then the instance will get terminated.
- Get System Log: Show the logs of the instance.
- Terminate: Delete the instance.
- Reboot: Restart the instance.
- Stop: Stop the instance.
- Start: Start the instance.
- Enable Detail Monitoring: Enable the detail monitoring of your instance.
- Add/Edit Alarms: Add a new alarm or edit an old one.
NOTE: Stopping and Starting the instance will change the instance Public IP.

In this blog, I have explained you about a very simple process of creating and managing your instances using Amazon EC2 Console. In my next blog, I will show you how to create a instance from your application using AWS SDKs.
If you have questions or need any further assistance, do write to us at support@shephertz.com


Leave A Reply